So far we’ve only discussed a color managed workflow when dealing with still images coming from the renderer and brought into Photoshop. The beauty of all this is that it doesn’t differ very much when dealing with animations going to film or video.
Everything we’ve learned so far applies just the same when importing the rendered frames into a post processing / compositing package to start manipulating the sequences.
I’m currently using After Effects as my compositor, even though I’m very fond of node based compositing. Fusion has been my primary compositor for years and I really enjoy the workflow in Fusion, but as it doesn’t do display compensation for soft proofing it has become slightly useless in my workflow. I mean what’s the point doing color correction and grading if the viewport shows me the wrong colors? Of course I could work around that by taking the route through After Effects afterward to color manage it, but that really shouldn’t be necessary in an application with Fusion’s price tag. And it doesn’t seems like Fusion 6 will get true color management either, which will make me continue using After Effects for the time being, despite it’s layered approach.
The same is true for Nuke, no display compensation there either. I haven’t used any other compositing packages recently, so there might be others that are color managed except After Effects, but not that I’m aware of. If the upcoming version of Blender receives the color management treatment as have been suggested on their website, that will for sure be an interesting option. Blender has a built in node compositor, which I truly miss in After Effects, and as Fusion doesn’t seem to head in the color management direction, but Blender does, Blender might be my next compositor, unless After Effects CS5 get nodes. Time will tell.
Okay, let’s continue with how I use After Effects in my color managed workflow.
After Effects
The color management workflow in After Effects can be split up like this
- Assign the correct ICC profile to all imported footage and images that are untagged.
- Select a color working space for the project.
- Output the footage, converted if needed, to the destination color space.
After Effects lets you work in nonlinear or linear environments. Using linear compositing is my preferred method, but I’ll talk about both. They don’t differ that much, and I’ll start with the standard nonlinear 8 bpc workflow, and then expand upon that to move into the linear world.
Non Linear Workflow in After Effects
When starting a new project in After Effects, you need to start with setting up the project’s overall color management settings. This is defined in the File » Project Settings window.
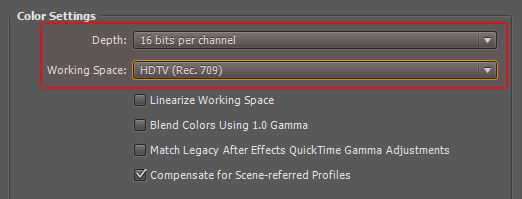
Color Settings in File » Project Settings
The depth should be changed to 16 bits per channel, even if you intend to work with 8 bit footage, as the extra bits reduces the risk of loosing image quality when you start tweaking the footage. When you change the Working Space from none to a common color space, color management is turned on in After Effects. Choose the color space that’s most suitable for where you intend the footage to end up. If you are going to publish it online, sRGB might be a suitable working space. If the destination is TV or video, SDTV or HDTV is the best spaces to be in. If the footage will end up on film, you probably would want to work with linear footage anyway, so I won’t go into those color spaces yet.
That’s it, your project is now color managed to the working space of your choice, and the composition display will be compensated based on your monitor profile to show the correct colors for this working space.
Now it’s time to start importing the footage into the project. All imported footage will get the color values converted to the working space when you start compositing them. Imported images that are tagged with an ICC profile are ready to go right away, but most footage will probably not be tagged – video clips and rendered image sequences. This footage need to be manually assigned their correct color space, and then After Effects can interpret their colors correctly.
To assign a profile to untagged imported footage, right click on the footage in the Project Panel and then select Interpret Footage » Main and in the settings window that opens, head for the Color Management Tab.
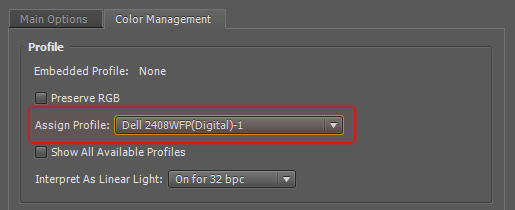
Assigning a Color Profile to imported footage.
If it’s imported video footage, you might want to use SDTV or HDTV color profiles for it. But in our case, it will probably be rendered image sequences. If you haven’t designed and proofed the render for a specific color space, and you have rendered 8 bpc images, sRGB is probably the best choice. Unless you have worked on a wide gamut monitor without proofing the render. Then sRGB will look way to undersaturated compared to what it looked like in your 3D application. You have designed the render to look good on your monitor, so then the obvious choice of a color profile should be your calibrated monitor profile. This is exactly the same as we talked about in the Color Manage 3D Renders in Photoshop section earlier in this article. If you haven’t read that section, take a minute or two and head back there, to get the deeper explanation of why your monitor profile should be used.
Alright, everything is set now, and ready to go, so start compositing away.
When you’re done and ready to render and output your project, if your working color space has been the same as where you are going, there’s nothing more to do, render as usual and everything will be a-okay – no colors need to be changed. If you need to output versions for different media, let’s say you have been working in HDTV and need versions for SDTV and the web (sRGB), that’s easily done. Go to the Output Module in the Render Queue and switch to the Color Management tab. Here you can select another color space you want your render’s colors converted to, and then you can happily push the render button.
Linear Workflow in After Effects
Okay, bringing rendered sequences into the color managed workflow was a no brainer in the nonlinear workflow, as we just saw. How about the linear workflow then? Well, it’s more or less just as simple. Let’s go.
First of all, let’s head into the File » Project Settings window, and setup our workspace.
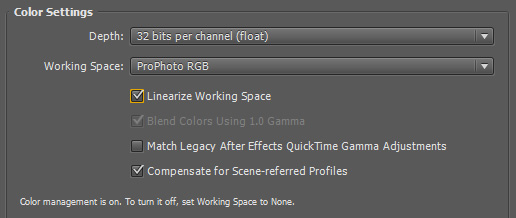
Linear Floating Point Workspace Setup
For the depth, select 32 bits per channel (float) to put After Effects into working in floating point. For the Working Space I usually go with ProPhoto RGB. ProPhoto RGB is the working space Adobe used to recommend when working in linear floating point, but since the release of After Effects CS4 they have recommended Universal Camera Film Printing Density instead.
I did compare the gamuts between ProPhoto RGB and Universal Camera Film Printing Density profiles and ProPhoto RGB has a larger gamut. So I’ve opted to continue working in ProPhoto RGB to be in as large gamut as possible. I don’t know if there is any other advantages working in Universal Camera Film Printing Density, except if you deal with imported film footage I guess. But as long as one is dealing with 3D generated sequences my guess is that ProPhoto RGB is the most suitable. If anyone knows more than me on this subject why a switch to Universal Camera Film Printing Density would be appropriate for CG work as well, feel free to enlighten me with a comment to this article or contact me.
And then, of course, we need to check the Linearize Working Space checkbox. Compensate for Scene-referred Profiles should also be checked so After Effects makes any gamma adjustments needed to imported footage. And done, After Effects is now set to work in floating point linear space.
As in the nonlinear workflow, when the footage has been imported it’s time to assign the appropriate color profiles to the footage, by right clicking on the footage in the Project Panel and then select Interpret Footage » Main and in the settings window that opens, head for the Color Management Tab.
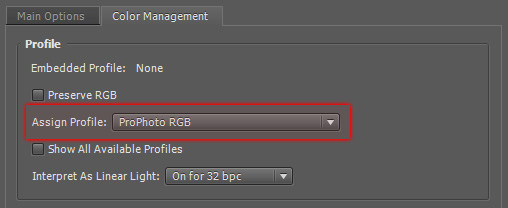
Assign the appropriate ICC profile to the imported Footage
When working in LightWave, I usually create my floating point renders designed for the ProPhoto RGB color space, so that’s the profile I assign then. Untagged floating point footage defaults to linear sRGB, and you can keep it at that if you haven’t made it for a specific working space and have used a monitor close to the sRGB working space. If you’ve been working on a wide gamut monitor and haven’t designed it for a specific working space you will probably want to assign it your monitor profile to make it look correct. If you have film footage you need to bring into the mix, use the Universal Camera Printing Density profile or a specific film stock profile.
That’s about it, working space is set up to floating point and linearized, color space is selected and all imported assets have been assigned their appropriate color profiles, so now you’re ready to composite away as usual.
When the time comes to export your footage out of After Effects, you probably don’t want to export it as linear ProPhoto RGB, but convert the colors to a more common format. When you have added your project to the Render Queue, you’ll find a Color Management tab in the Output Module as well.
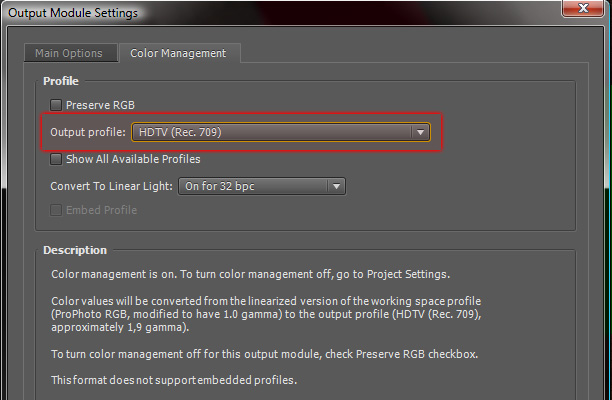
Color Management in the Output Module
In this tab, you can select the color space you want your rendered footage outputted to. If you’re going for HD, you can select the HDTV (Rec. 709) profile, if you’re going to film you have the Universal Camera Film Printing Density at your disposal. Adobe has also provided a profile for digital cinema projection, which is getting more common. If that’s your destination you have the DCDM X’Y’Z’ (Gamma 2.6) 5900K profile to use.
You can also bake in a film stock look before outputting to HD or DCDM for instance, by using the Color Profile Converter located in Effect » Utility.
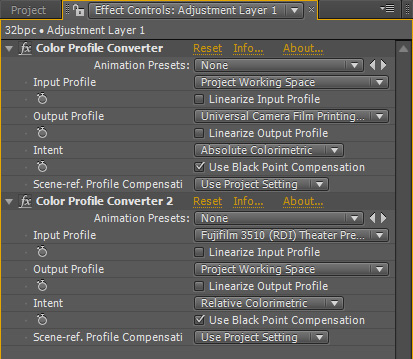
The Color Profile Converter to Bake in a Film Look
Add a new Adjustment Layer on top of your composition, and then apply two instances of the Color Profile Converter to it. See the screenshot above for a common setup. In the first instance the input profile should be your working space, and the output a printing density profile. Universal Camera Film Printing Density is a good choice, but you could also try out the other density profiles for different looks. The rendering intent should be set to Absolute Colorimetric.
In the second instance, the input profile should be one of the Theater Preview profiles available. After Effects comes with a few Fujifilm and Kodak Theater Preview profiles. And the output should be back to your project working space. The rendering intent in this instance should be Relative Colorimetric.
Oh well, that sums it for the different After Effects workflows.
Film Editing
I use Adobe Premiere Pro CS4 for film editing. Technically speaking it’s a video editor but it works fine for my humble needs to edit together my film projects, as it do allow you to customize the project settings to anything you like more or less. Film / Video, it’s like ‘I say tomato, you say…’ to me in this case.
Premiere Pro CS4 is not color managed, which is bothersome for us wide gamut display people. But to quote Adobe’s technical paper Color management workflow in Adobe After Effects CS4: “Currently, Adobe Premiere Pro does not support color management”. They say “currently” and that gives me great hope that Premiere soon will get the color management treatment. It’d be awesome when the time comes for the CS5 upgrade if color management in Premiere is one of the new features.
In the meantime, I have found a workflow that works for me. I don’t touch any of the color controls in Premiere or do any kind of work that would affect colors at all really. I do all my color gradings and touch up in After Effects and then I use Premiere as the final stop to put all scenes together, adding dissolves and of course the audio tracks. So it’s really just the sequencing functionality I rely on at the moment to put everything together, get the timings right and so forth, while all the real work gets done in After Effects to get the look like I want it. I also load the final output from Premiere into After Effects afterward for soft proofing if needed.
There’s a few other Non Linear Editors in the market, and I don’t have that much hand on experience with them to know if any of them already is color managed. I’ve come to understand that the latest version of Sony Vegas Pro, version 9, has some form of color management, supposedly soft proofing based on the monitor profile. But I haven’t had the opportunity to try it myself, but that could be worth checking out if you’re looking for an editor and need color management.

holy cow,
thanks much johan. i’m doing work for the first time that’s going film-out (wheeee!) and trying to wrap my head around color management was confusing as heck until i found your article! you really deserve a tremendous amount of credit for cracking open this black art for the rest of us. stu maschwitz has some good stuff as well but he didn’t talk about renders from 3d and that’s the stuff i’ve been dealing with.
a few questions:
– i cannot “convert to profile” in after effects on a 32bpc open-exr file. the option is grayed out. is this normal? is this a limitation because it doesn’t seem like it should be and it is not documented. i can convert 16bpc and 8bpc fine though.
– if i do NOT use “proof colors” and “proof setup” with monitor rgb, the colors that i see in photoshop look nothing like what the colors should be or at least what was rendered from lw. so in that case, how would i “soft proof” inside of photoshop?
– in after effects, how do you “soft proof” if your project setting’s work space is something like film? for every profile that i select there, the colors look different on my monitor though i though AE was going to do somekind of magical autoconvert to my monitor’s color space so i can work.
if it does NOT do that, then wouldn’t it make sense to work in your monitor’s colorspace and then convert to destination color space only on output settings?
————————————
anyway, thanks again. this is a tremendous resource!
jin
Hey Jin,
Happy you found it useful.
So, let’s see if I can answer you on the top of my head. :)
1. Convert to profile – That doesn’t sound normal. It should work just fine with 32bpc. I’m currently working on a film shot myself, and did just that earlier today with 32bpc exr files coming from LightWave. Are you using AE CS4 or an older version?
I’m not sure how well AE deals with exr files in earlier versions.
3. (switching order here) In AE when working for film, you should keep your working space to 32bpc and use a universal profile with a large gamut. ProPhoto RGB used to be a good choice (and still is), and in CS4 you have the new Universal Camera Film Printing Density profile to work with (which I currently use myself).
Then use the Simulate Output function in the View menu to compensate the view in AE to see how the colors will end up in the final destination.
Adobe has a preset Universal Camera Film to Kodak 2383 which is most common in the Output Simulation, but you can easily set up your own output with the custom setting. Where you can setup both the negative film stock (output profile) which in the case of 3D the universal profile is useful, and the distribution film stock (simulation profile) if you know on what stock your footage is going to end up on. And you will get a good representation of how the final look will be when projected on screen.
2. And you second question about Photoshop, same thing there, assign the profile of you footage when importing (also usually Universal Camera Film Printing Density). Which will make the image pretty dark, so in Proof Setup, use a custom setup with ProPhoto RGB as the device to simulate, uncheck preserve RGB numbers and use Absolute Colorimetric as the rendering intent. Highlights might be clipped (visually only) with this setup, but it should give you the best representation of the film footage inside Photoshop.
To match the look from LightWave, you can either first convert the render from the monitor profile into your film density profile, or use the SG_CCFilter in LightWave to soft proof against the film stock profile and then do the final render without SG_CCFilter applied, and it should come in correctly when assigning the film stock profile in AE/PS.
Hope this helps.
And congrats on the film-out job, adds some spice to the craft when going to film. :)
Cheers,
Johan
hiya johan,
thanks! that’s just what i needed to know!
oh, but in question 1, it’s in photoshop, not in AE. and i’m using photoshop cs4 (ae cs3).
in photoshop, if i open an open exr 32bpc file, the “convert to profile” is greyed out.
if i convert the file to 16bpc or 8bpc, the button comes ungreyed and i can do it but it won’t work on 32bpc.
is that normal?
thanks again and yah, can’t wait to see some of my stuff on the big screen. : )
jin
AHHHHH!
VIEW>SIMULATE OUTPUT!!!
that’s the missing piece of the puzzle for me! do you talk about this in your article? cuz other articles too, they generally stop at the -identify profile of asset -determine working space.
and then my brain is going nuts asking the same question… but but… won’t that look all messed up to me on my monitor if my work space is not the same as my monitor?!?!
as for the photoshop solution… ok cool – so you DO use ‘proof view’ ‘proof setup’. but just NOT monitor RGB. i got the impression that you were not supposed to use the proof view at all!
aha!
thank you so much johan, that totally clears things up for me!
jin
No, now when you mention it, I don’t think I’ve written anything about the output simulation. Must have slipped my mind when writing – the article did get a bit longer than I had intended anyway. :)
Ah, okay, you meant in Photoshop, then that’s the correct. Convert to Profile is grayed out in 32bpc. There’s a few tools that don’t work in 32bpc in Photoshop, but much less in CS4 than in CS3 where almost no tools worked with 32bpc. I wouldn’t be surprised if Convert to Profile will work with 32bpc in CS5 though.
Yes, Monitor RGB is useless as a proof view as it doesn’t proof for anything outside your own system. But other than that proof view is a handy tool to check the output. Both for print and for film work.
Extraordinary great article! – I wont post anymore praise although you deserve it.
Here is my question for the APPLE world: (using a wide gamut HP LP2475w monitor)
Final Cut Pro and Apple Color are of course “color managed” – but they are managed automatically and dont have options like AE to select the right color space. (After Effects works great on MacOS 10.6 with above described by the way)
Resulting in red faces in FCP and Apple Color. Which is a pity since the monitor would be good enough to approx. do some real color grading (possible in After Effects).
Is there ANY way to force FCP / Color to use the profile After Effects uses? / any other workaround?
Thanks ind advance – and I am sure there are lots of Apple’s out there who would love to get the answer for that.
I just added a comment to this page of After Effects Help to point people to this great article:
http://help.adobe.com/en_US/AfterEffects/9.0/WS14AC4DDE-84D7-4fc9-B79C-897F2C78EA29a.html
I encourage you to do likewise whenever you publish something relevant to After Effects.
Keep up the great work!
Thanks a lot for this great article.
I’m currently using an Eizo Cg241W(ide Gamut) on Mac OS X and had those exact same problems. I’m loving the wide gamut display for my photoshop work, especially if it goes to print, but using cinema 4D always gave me headaches. Never even thought of using the monitorprofile for renders, instead I often use my old Apple Cinema Display for working in Final Cut and other non color managed applications.
One question though: Did you ever use a breakout card and a video monitor for grading and editing? I really wonder how well a job a device like the Matrox Mini in combinatioin with a low cost hdmi monitor does.
Thanks again Johan and all the best.
martin
Martin,
I used to work with an external reference monitor in the past, but I haven’t done so for years as the kind of work I do now rarely sees the need for it. Using the proofing in After Effects works fine most of the time and saves me some money and equipment.
So I don’t really have any clue how far the Matrox Mini with a low cost hdmi monitor will take you with color accuracy, sorry.
Cheers,
Johan
Thanks Johan for the quick reply,
if I get one of those matrox boxes, I’ll let you know about it’s ups and downs.
Hi,
Great article. I’ve done pretty much the same setup with my HP LP2480zx and my LP2475w.
Why did we switch our recommendation from AdobeRGB to the Film Profile for linear work? Probably because most people doing linear work when we wrote that paper were outputting to DCI, or DPX for film printing. Keeping the primaries the same between the output color space and the working space is one fewer places where the ICC color engine needs to interpret colors on your behalf.
Also, gamut is somewhat misleading in a floating point color space. Traditionally gamut is limited by the color components maxing out at 1. With a floating point color, you never max out, and colors can even go negative, which is very confusing from a human vision perspective :). Keeping all colors positive can help downstream, so it generally makes sense to have your working space match your output space if at all possible. You can even linearize sRGB if all your work is just ending up on the web.
–Chris Prosser
After Effects Engineering Manager
Hi,
thanks a lot for this great article… I really think this is the best and clearest one all around the web.
It’s a long time since you wrote it… but I would like to contribute with something…
I think I found a workflow to make Premiere CS6 ‘Color Managed’ in some way:
Does it make sense for you? …I am not a color expert, but after a long time fighting with color shifts in my wide gamut monitor I found this little trick. Now I can see almost the same colors in Premiere that I see in my color managed AE project….
I hope this helps…
Thanks a lot for your efforts.
@Issac: Super! Thank you very much for your contribution. I’ve never tried LUT buddy, but it sounds like I definitely should do that.