At the moment LightWave 3D is the only application that I am aware of that can do true soft proofing in the render display to any color space and use the monitor profile for display compensation.
This is something I hope will become standard in every application as wide gamut displays are becoming more common and without this functionality there is now way you can see the correct colors when rendering.
Other than LightWave, it seems like Blender has planned to implement full color management in a coming version. Blender is getting more and more impressive for a free application, and if they implement this I will for sure take another look at Blender, especially considering the compositing part that will be extremely useful if it does soft proofing as well. Here is a quote from the page I linked to what they have planned in the terms of color management, exciting:
“Color Management. Implement and document a system to do color management in Blender. This involves adding support for doing various color space conversions, and integrating them in areas such as the renderer, sequencer and image window display. Specifically, importing and exporting images in various color spaces, color proofing etc should be possible.”
When working in a 3D application that doesn’t do full color management for soft proofing between color spaces, on a wide gamut monitor, the resulting renders will have dull and undersaturated colors when brought into Photoshop for instance, not fun at all. Of course, there is a way to deal with that as I lined out in the Color Manage 3D Renders in Photoshop section earlier in this article. But still, it’s a tremendous amount more convenient to be able to proof it directly in your renderer.
LightWave 3D with SG_CCFilter
To make LightWave 3D color aware, you first need to get the excellent free Color Correction plugins from Sebastian Goetsch available in 32 and 64 bit versions, which brings much power to LightWave regarding color management. A color aware color picker, color correction nodes that can use ICC profiles and so on. These tools are also sweet when having a linear workflow.
What we’ll be looking at now is Sebastian’s SG_CCFilter, which allows you to use ICC profiles for the rendering display, so you can see the correct colors directly in LightWave when rendering scenes, ie you get complete display compensated soft proofing. Wohoo! This is actually a life saver when working on a wide gamut display. LightWave is currently the only 3D application where I can actually see the exact correct colors while setting up and test rendering.

Color Awareness in LightWave 3D
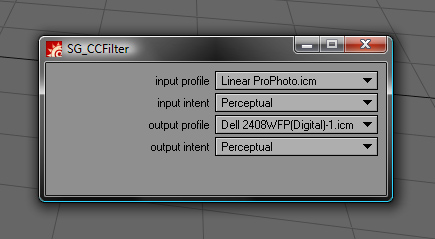
In the screenshot above you can see my setup in LigthWave 3D using SG_CCFilter to get a correct color managed workflow. I am using a linear workflow, rendering to OpenEXR and then I am working in ProPhotoRGB space in Photoshop to take the most advantage of the range of colors offered by a floating point image format like OpenEXR.
Input profiles typically describe the color characteristics of scanners and digital cameras, whereas Output profiles describe devices such as monitors, printers and film recorders. Input profiles are often referred to as one-way since they represent the source device. In this case it’s LightWave that is the input, working in Linear and the output is my monitor.
In the setup in the screenshot above I am telling LightWave to use the linear ProPhoto color profile for the render and then take into account the Spyder calibrated profile for my monitor. This makes the render window in LightWave display a color identical image to what I’ll see when I open the floating point image in Photoshop.

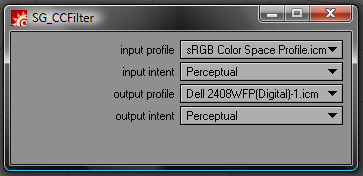
Setup for sRGB proofing in LightWave
To the right is another example when working in a classic nonlinear workflow. Here I use the filter to make the render window proof the render in the sRGB color space. I don’t use a linear color profile here but the standard sRGB profile and then my monitor profile. This makes the render display exactly in LightWave as it will when I open it in Photoshop and assign the sRGB profile to it. Of course using the standard AdobeRGB or ProPhotoRGB profiles works just as fine for proofing in a nonlinear workflow.
I can’t express in words how helpful this is when working on a wide gamut screen, it really saves the day. So just assign your intended color working space, and LightWave will give you the correct colors in it’s render view. No more oversaturated colors!
Remember to disable the filter when doing the final renders, as you don’t want the modified colors to be saved in your rendered file, this is only for display proofing purposes.
