-
Elly
- Published
- 23 Jan 2009
- Applications
- LightWave 3D
- ZBrush
- 3ds Max
- Photoshop

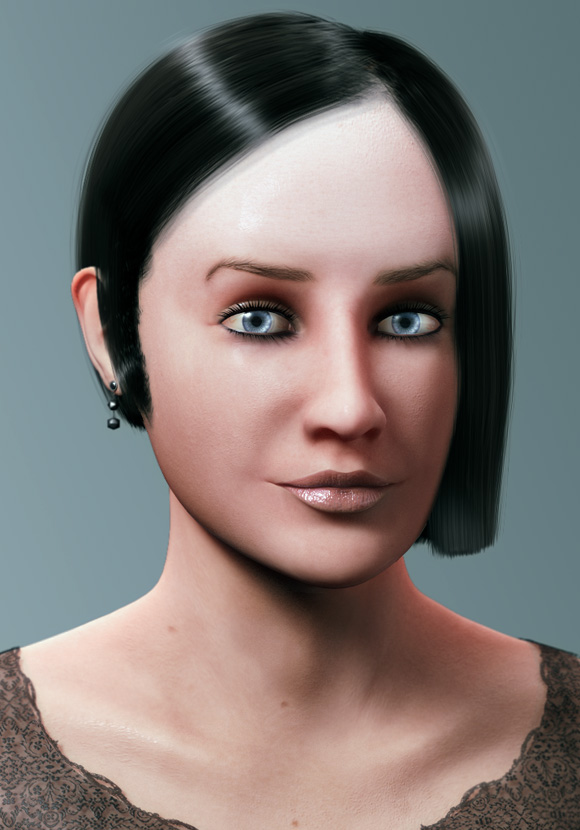
Elly was character that I created at the end of the LightWave 9.6 beta cycle, to play around a bit with skin shading and the new FiberFX features.
The aim with this project was to explore and get to know FiberFX and the Simple Skin Material a bit better in LightWave 9.6.
As I was in progress to resurrect a few old unfinished projects, I found this character from about a year ago which I thought was an excellent object for this exercise. I had pretty much just started modeling her in LightWave and slapped on some temporary textures. But the model in it’s current state worked just fine to use as a base mesh for some sculpting. So I took the model into ZBrush, cleaned up and refined the head some and sculpted in details for the lips, skin pores and such, which I could export out as a normal map to be able to keep the model low poly in LightWave. It’s about 1500 polygons in total.
As I am not too fond of ZBrush generated UV maps, as I like to be able to edit the maps in Photoshop later on if needed, I had unwrapped the mesh in LightWave before going to ZBrush to make sure I got nice, clean UV maps back.
As I intended to use my sculpted details to generate the scalar maps, I only painted a color map for the skin in ZBrush. Pretty basic paint job as I wanted to let the shader drive a lot of the skin down the road. In Photoshop I used the exported color map (diffuse map) to tweak into Subdermis and Epidermis maps as well.
I got the bump map and normal map by exporting my sculpted details from ZBrush, and I used the bump map as the base for my specular / reflection map, by just painting over some specific areas where I wanted to add or remove the highlights.
Then I plugged in all those textures into the Simple Skin Material in LightWave’s Node Editor and the shading were pretty much ready to go, I just had to tweak a few numbers in the material. I ended up painting some extra control maps for Fresnel and SubSurface Scattering visibility, but the next time I’ll probably just add a weight map and control those parts with a curve node.
To get a bit more control over the back lit Subsurface Scattering I mixed up the Simple Skin material with an extra SSS 2 node. I think the new SSS nodes in LightWave are fantastic, good quality and fast rendering. I also ended up using an SSS 2 node when I created the node network for the eyeball shading.
Everything is lit by three area lights, there was no need for Global Illumination.
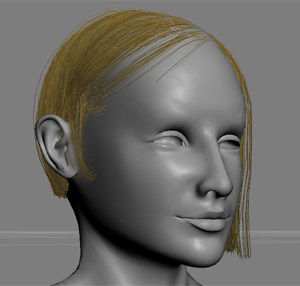
Styling Ellys Hair in 3ds Max
I could of course have gone the quick and easy route which is textured polygon hair, which can look excellent, but I wanted to give the hair rendering engine a spin.
So to create the hair, I brought the model over to 3ds Max. LightWave has excellent hair rendering options, but can be a bit tedious to use for styling long hair guides. Even though LightWave has improved a lot in this area the last year and in 9.6 it’s starting to get there, it’s still not as artist friendly as you can find in some other applications. I am sure LightWave will get there with the next update, but for the time being I prefer to style my guides when creating long hair outside of LightWave, and in this case I choose 3ds Max.
When I had something I was happy with I used my Spline Importer plugin to bring the guides back to LightWave, and did some final cleaning up and tweaks in LightWave after I had imported them.
I dedicated some time getting to know FiberFX a bit better and then it was a breeze to set up a decent rendering of the hair guides in no time. I guess I won’t be using Sasquatch again anytime soon.
I didn’t really spend any time modeling any accessories for her, other than the quite basic clothing and ear ring, as the purpose of this project was skin and hair. Well, that was pretty much the complete process to bring her from a left over model to a completed, textured character in a few evenings of spare time.
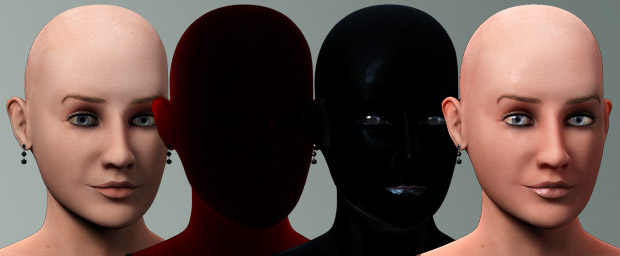
Compositing the different buffers from the renderer
I was actually pretty happy with how the untouched render came out of LightWave. I have a habit though of always taking advantage of the render buffers, as they are there anyway. I like to add them together myself instead of having the renderer doing it for me at the end. It does add a bit of flexibility if I need to tweak things and don’t want to re-render.
With this project I outputted buffers for Diffuse Shading, Subsurface Scattering, Reflection Shading and Specular Shading and composited them back together with the add mode in Photoshop, which make the result look identical to the beauty render from LightWave. I also rendered a separate pass with the hair and shadow and added to the composite. As I was pretty happy with how it looked already I only did a few minor tweaks with curves. So I could more or less have gone with the single beauty pass from LightWave, but as it almost don’t add any extra time splitting it up in buffers, I went that route anyway, just in case. I like to have the option if I need to do more adjustment in post.
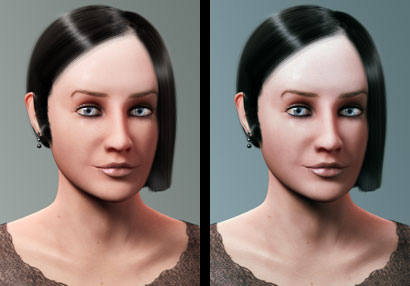
Before and After the final touch
And at last, the (in)famous final touch, I can’t seem to end an image without doing at least some final tweak to it in Photoshop, no matter how small the adjustment. Kind of obsessive behavior.
No exception this time… I had to do a final adjustment, nothing radical, but I adjusted the color balance and curves just a tad, and then I was done. To the left is a comparison of the render before and after I did the Photoshop adjustment to it.
Alright, that’s it. I hope some of you find the breakdown of creating this character useful.
Cheers!