A linear workflow is when you gamma correct all your colors to be in gamma 1.0, linear space.
Gamma correction is one aspect of color management, but it has nothing do with different color spaces. Still it’s an important aspect of a color managed workflow that will work in your favor if you adopt it, so I’ll write a section on this subject as well.
The linear workflow is based on the fact that the renderer works in floating point – linear – space under the hood. The same is true for digital cameras, where the sensor records in linear space, and can through the raw format also be brought into a linear workflow. When a renderer or a camera is ready to display the image, it tweaks all pixel data by adding a gamma compensation curve so it’s displayed correctly on the monitor. The gamma curve makes the image brighter and compresses the darker parts, which results in that the image we end up with contains lesser data than the original, which causes a loss of detail especially in the dark sections.
In the linear workflow we skip encoding the gamma into the image and we don’t limit colors to be within the 0-255 range, keeping details throughout the entire dynamic color range and get a much better image to do post process work with, without loosing quality or details. And then we encode the gamma as the last step when the image or animation is ready to be delivered, to ensure the best possible quality and colors.
By adopting a linear workflow several important advantages will be gained:
- More flexibility when post processing. The floating point precision and the large dynamic color range allows bigger exposure and color adjustments without loosing details. Also banding in the rendering becomes less of a problem when doing larger adjustments.
- Exposure adjustments in post behaves more photographic and natural.
- The reaction to lightning and global illumination behaves in an accurate way, resulting in more realistic renders. Light Falloff behaves more as in the real world.
- The antialiasing performs better, especially in high contrast areas.
- Less tricks and tweaking of lights and colors to get the look you are going for.
Alright, convinced yet? That it’s worth investing some time learning the linear workflow? If so, let’s see how we can work with it and bring it into the color managed workflow.
Gamma Correction Setups
In order to have a linear workflow we need to get rid of all existing gamma adjustments, and by that linearize all color sources that where previously in nonlinear space. Assets we need to put into linear space are:
- Color picker values.
- Color/diffuse maps, video clips, background plates, environments.
- Control maps, ie greyscale textures that control diffrent channels of the shader/material is already considered to be linear and don’t need to be corrected.
Usually these colors are encoded with a gamma of 2.2 to look good on the screen but we need them changed to gamma 1.0 instead to be in linear space. The most basic way to convert a gamma 2.2 image to gamma 1.0 is to change the gamma to 1/2.2 which roughly translates to setting the image’s gamma to 0.4546. This is not 100% exact, but close enough for most cases. The best option is to make a color space conversion, but very few renderers allows that in a straightforward way.
When it comes to rendering, we need to make sure we render without dithering, as dithering algorithms creates unwanted noise when working in floating point space. All final renders should then also be saved in a floating point format, like OpenEXR, which uses linear gamma space.
And finally while working, you’ll want to add a display compensation of gamma 2.2 to the render view to get soft proofing, otherwise the render will look way to dark. A gamma of 2.2 should also be put back at final delivery if you intend to deliver the image or animation in a nonlinear format like jpg, tga or tiff for instance, also dithering can be added at this step.
I do all my rendering in LightWave 3D or modo, so I’ll walk through how to set up the linear workflow for those applications. Most, if not all, modern 3D renderers have similar functionality to allow a linear workflow. So if you use another application, let Google be your friend and I am sure you will find a similar guide how to setup a linear workflow for the 3D application you are using.
Linear Workflow in LightWave 3D
Setting up a linear workflow in LightWave 3D is not as automatic as in some other packages, but it’s not really that complicated either. I’m pretty confident LightWave Core will be excellent in this regard when it’s ready for prime time, but in the meantime we’ll settle for what we can do with LightWave 9.6. And 9.6 can be quite powerful in this regard, even top of the line with some work and with the use of some plugins. But lets not rush things, but start with how we work with LightWave out of the box.
LightWave’s render engine always work in linear space. To start taking advantage of that, all you have to do is to start gamma correcting all the color values you input into the render engine and you are ready for prime time. Doesn’t sound too hard, does it?

Gamma Correcting Images
Gamma correcting images in LightWave can be done in a couple of different ways, settle for one or learn them all and use the most effective one for each situation.
The most straightforward way is to go into the Image Editor » Editing Tab » Gamma and change the gamma to 1.0/2.2 (screenshot to the right) for each image that needs to be gamma corrected (assuming they are originally in gamma 2.2, which is most common). Another option would be to go to the Processing Tab in the Image Editor and use the FP Gamma Filter.
I’m personally a sucker for the node editor in LightWave and do all my gamma corrections there. Unfortunately LightWave doesn’t provide a gamma correction node out of the box. It can be done anyway but it’s unnecessarily complicated so I won’t go into it here, as there exist some excellent free gamma correction nodes, which I’ll cover in the next section instead.
LightWave’s color picker can’t be made gamma corrected, so here you unfortunately need to eyeball in the correct colors and check your renders. Not a pretty solution, fortunately there are solutions to it, covered in the next section as well – gamma enabled color picker as well as using gamma correction nodes.

Full Precision Gamma Image Filter applied for basic soft proofing.
And then we need to proof the render, in Image Processing » Processing » Image Filter apply the Full Precision Gamma filter. If you have other image filters applied, make sure the FP Gamma is the last in the list. This filter is only used for basic soft proofing of the render display, so the linear image doesn’t display too dark but looks as expected on the monitor. When you are ready to do you final rendering, remember to disable this filter so the gamma curve doesn’t get encoded into the final image if you intend to do any kind of post processing.
LightWave Dithering Settings
And finally, you need to disable dithering as that creates noise when working with floating point images. You find LightWave’s dithering settings in the Image Processing » Processing tab. As I usually work in linear space I’ve set LightWave to default to dithering off. Renders should then be saved into a floating point image format, like OpenEXR, to keep the huge range of color data when brought into Photoshop or a compositor.
That was the out of the box workflow, now let’s see what extra goodies that exists for LightWave to make this a bit more user friendly and easier to work with.
LightWave Plugins for Linear Workflow
There exists a few different 3rd party tools for LightWave that helps in the linear workflow, happy days!
Correction Nodes
Here you have two different options, Simple Colour Corrector, part of the db&w tools collection and SG_CCNode. They both do the job. Simple Colour Corrector provides basic gamma correction while CCNode is a bit more advanced and also provides conversion between color spaces. If you work with textures in other color spaces than sRGB this is the node to use.
Most of the time I use the Simple Colour Corrector but it happens that I have textures in AdobeRGB or ProPhotoRGB and then CCNode is just great to have in the toolbox. Other than correcting images these nodes can also be used to correct picked colors – no need to eyeball colors then because of LightWave’s built in color picker’s lack of gamma correction.
Color Picker
And of course, using color nodes and adding gamma correction them can be a bit cumbersome, so then it might be handy to use a gamma corrected color picker instead. There is two to choose from, SG_CCPicker and Jovian Color Picker. I’ve personally gone for the Jovian Color Picker. It’s an awesome color picker in every aspect, and I wish I had it for every application I use.
Soft Proofing
There is two options here as well, SG_CCFilter and exrTrader. CCFilter is one of a kind, because it doesn’t only do gamma correction it also does color space conversions, which makes the renders look completely correct even on a wide gamut monitor. This is the soft proofing plugin I almost use exclusively. On the next page about soft proofing I’ll go into deeper details how to use this one.
exrTrader is at first an OpenEXR saver, which let’s you save all LightWave’s render buffers into a single exr file, which is very nice if you do a lot of post processing. But it does also let you apply a display gamma, so it’s useful for soft proofing as well. And the beauty of exrTrader versus the built in FPGamma is that you don’t have to disable the display gamma when doing final renders if you work with exrTrader.
And here you can find the tools:
- CCNode, CCFilter and CCPicker by Sebastian Goetsch.
- exrTrader and Simple Colour Corrector by db&w.
- Jovian Color Picker by Ken Nign.
Linear Workflow in modo
Setting up a linear workflow in modo 401 is pretty easy. First of all you want to go in and enable Preferences » Display » Rendering » Independent Display Gamma. As an image with a gamma of 1.0 looks too dark on a monitor you want to be able to set the render display to it’s own gamma to be able to proof your renders correctly. With this enabled you can set your render view to display in gamma 2.2 while the actual raw data is kept in gamma 1.0 for saving.
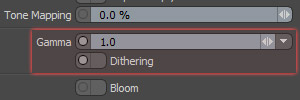
modo Render Output
Next we need to tell modo to render in linear space, gamma 1.0. By default modo renders in gamma 1.6, so let’s change that. Locate the Final Color Output in your Shader Tree.
In the Render Output Properties you will find the Gamma settings towards the end (screenshot to the right). Change this value to 1.0, and bam, you’re done. modo is now rendering in linear space.
You also want to deselect Dithering in the Render Output, as that will create an excessive amount of noise when working with floating point images.

modo Image Properties
If you use any color image map textures, they are usually standard sRGB files which are encoded with a gamma of 2.2, and you will need to correct them. In the Image Properties for each image, change the gamma to 1.0/2.2 (screenshot to the right) which translates to a gamma of 0.4546 and you will have converted the image from nonlinear to linear gamma 1.0 space.
There’s really not more to it. When it’s time to render, change the display gamma in the render window to 2.2 if needed, which will soft proof it so it looks correct on the screen with an applied gamma while still maintaining the gamma 1.0 under the hood (that’s why we changed to independent display gamma in the preferences earlier).
And finally, save the image to a floating point format like OpenEXR, which uses linear space and contains the full range of colors for maximum flexibility in post processing.
If you had to change the render output and display gamma for each new project, it would become a bit tiresome in the long run, luckily modo lets you set default values for these settings in Preferences » Display » Rendering. In the screenshot below you can see how I’ve setup my defaults in modo for a linear workflow. Worth noting is that you also can enable it to gamma correct the color picker, a very handy option.

Setup in Preferences » Display » Rendering
Photoshop and Tone Mapping
Bringing in the floating point, linear image to Photoshop is a straightforward operation. When you open your OpenEXR file, Photoshop will switch to 32 bits/channel mode and assign a linear working space. I prefer to assign the ProPhoto RGB profile when I open an OpenEXR image, and photoshop automatically linearize the profile at this time. Couldn’t be easier.
When working in 32 bpc mode in Photoshop are not all adjustment tools available, and at the times I need those tools I usually do everything I can with the image in terms of putting layers together, exposure adjustments and such and then convert it down to a 16 bpc image and continue working from there.
Photoshop’s OpenEXR loader/saver is a bit limited in my opinion and doesn’t work exactly how I’d like it to work. If the image contains an alpha channel it opens with the alpha already applied as transparency. I prefer to get my alpha as a separate layer in the channels panel. It can also only handle RGBA, and even though the OpenEXR format let’s you store tons of buffers inside a single image file, you can’t take advantage of that. So if you need better handling of the alpha channel and want to use the possibility of several layers inside a single OpenEXR file, you might want to check out the ProEXR plugin for Photoshop which gives you all these possibilities.
Tone Mapping
When having worked with a floating point image that contains a high dynamic range of colors you will probably want to convert it to a 8 bpc image at some point for delivery. As the HDR image you got from the OpenEXR format for instance can contain extreme highlights and tons of details in the dark areas, information you want to keep can be lost when compressed down to the color range of 0-255. This is where tone mapping come into play, which let’s you control how the compression of colors should behave.
When you use the Image » Mode » 8 (or 16) Bits/Channel function in Photoshop to convert down your image from 32 bpc you will be presented with the HDR Conversion window. This is where you perform your tone mapping in Photoshop.
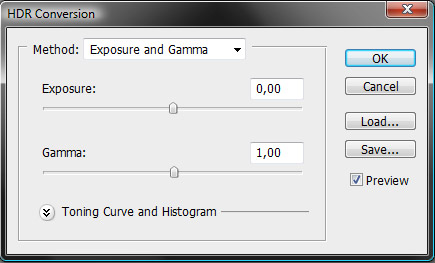
Default Settings in HDR Conversion
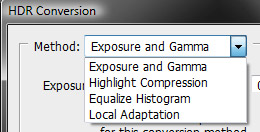
Available Conversion Methods
Above is the default settings of the HDR Conversion dialogue, but you actually have four different methods available to your disposal of how to perform the conversion from the high dynamic range to an 8 or 16 bit format.
Exposure and Gamma perfoms an image wide adjustment of brightness and contrast in the image. This is useful at some times if the image doesn’t require much adjustments.
Highlight Compression performs an automatic compression of all highlights in the image exceeding the target bit depth. Not very useful.
Equalize Histogram performs an automatic compression of the entire dynamic range to fit within the range of the target bit depth while trying to preserve the contrast. Not very useful.
Local Adaptation – Now we’re talking, this is the useful method that delivers the goods. This is where you actually can perform some real tone mapping. Expand the Toning Curve and Histogram section to get access to the adjustment curve to do local brightness adjustments. With the curve you can easily bring down any overblown highlights while at the same time bring up details from darker regions that would disappear without the local adjustment possibilities. This is the method I use the most.
The Radius specifies the size of the local brightness regions, while the Threshold determines how far apart two pixels’ tonal values must be before they’re no longer part of the same brightness region. You can use the Corner checkbox for a point in the curve to avoid interpolation to the next point.
A nice tip is that you can use the eyedropper tool on the image to quickly find the corresponding location in the adjustment curve.
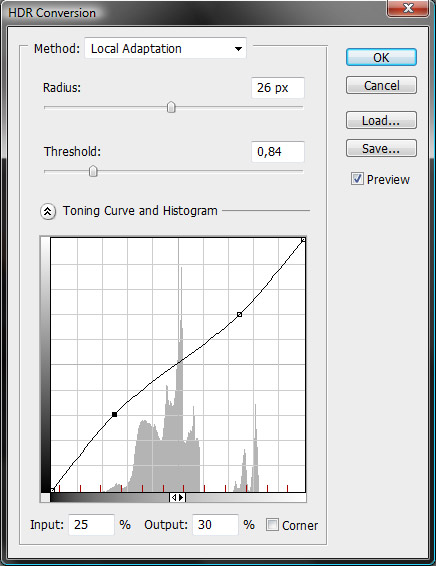
Tone Mapping with Local Adaptation
I made a quick, basic illustrative example. On purpose I went way high with the lighting to get an extremely overexposed render, where almost everything is blown out to white. This shows the power of working with floating point images, as all details that got lost in the overexposure is actually still there and can be brought back into the image. This is impossible with 8 bpc formats. I’ve used local adaptation to re-expose the image in this example, to have full control of how I want the highlights and shadows to appear in the final image.
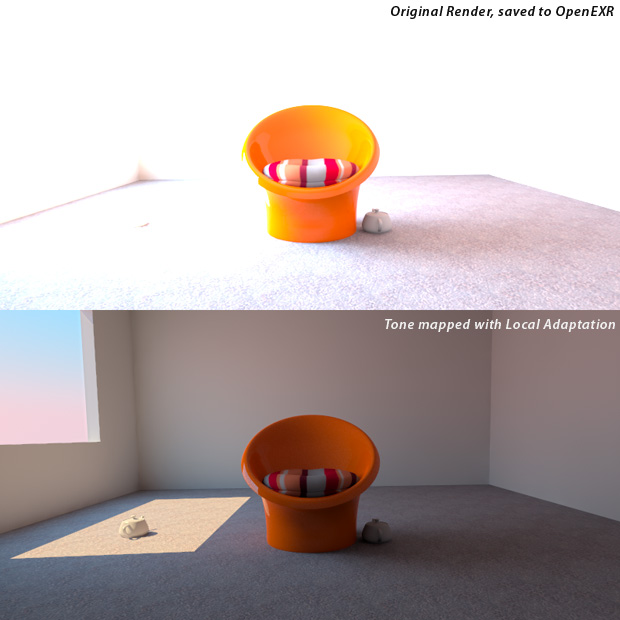
Overexposed Render Tone Mapped in Photoshop
And oh, when you convert down from 32 bpc in Photoshop, dithering will be applied to avoid banding, so even though you didn’t use dithering while rendering, you get it added here instead. And if you see banding while previewing when changing the parameters in the HDR Conversion window, don’t worry, as the banding will most likely disappear when the dithering is applied when you commit to the changes.

I have a problem, i dont know if you can help me, anyway.
My problem is that after i finish converting a 32 picture to an 8, i click ok, and then, everything i’ve done just go out, and a overgammed picture comes out that i have to correct through gamma settings to obtain a “similar” picture to the one that was shown to me in preview; this is using hdr conversion through “local adaptation”. Do anyone knows how can i fix this?. Thanks…
Hey Johan,
Just to let you know, lightwave 10 now has LCS workflows built into the interface/colour pickers/etc so it’s now easier than ever. Also, 10.1 has LUT you can set as presets to make these things even easier :D
Hey thanks,
Oh yes, I’m keeping track on LW10.x. I should probably update these texts down the road or replace with videos.
I’m really hoping that they will get LUT/Monitor Profiles working correctly in 10.1, that would make life so much easier. :)
Cheers,
Johan
Hi Im a guy from Spain, that started with CG when i was 11, my english reading is good, but talking or writing is another history. So please excuse me in advance.
In my humble opinion, linear workflow doesn’t make people work better, or make better images, it’s just a way to make people feed their render engines with linear data, this is because most popular non reyes engines (very resumed affirmation) use noise/color/intensity thresholds to undersample all kinds of features that in the end speed up the rendering time, all this fancy stuff has a major drawback, some postproduction guys doesn’t like to work with LDR images. Linear workflow is a way to produce images with a wide range midtone histogram, making them more flexible to edit in postproduction, like a photographer exposes thinking about their laboratory work.
In the real world, you try to produce realistic or non-realistic concepts/images, if you know what you are doing is nothing bad about working with a non linear workflow. You only have to know what you want to do with the image after being produced, personally i prefer to work in a traditional way, and just tune up my render engine to give me details even on dark areas. Linear data has been always there, nothing new with linear workflow, just a way to control visually the histogram, for post production purposes.
I think that there is so much hype with this kind of workflow, it turns specially useless when the actual render engines just give gamma corrected images just for preview purposes. The real thing comes when you save the framebuffer.
Not to mention when your render engine have some kind of “physical camera”. Then LWF doesn’t make sense.
Too much hype for tech stuff.
Thanks :)
Just wanted to explaing something when i wrote “is nothing bad about working with a non linear workflow” I meant to say is nothing bad to watch non linear data on your screen. Just be sure that under the hood all stays linear, thie is a commom mistake when saving framebuffers or using some tone mapping / color mapping tools.